Tiling Tools Review: My Most Popular Post
There is one post that consistently keeps directing people to my blog, and it’s this review of a Husky Wet Saw and other miscellaneous tiling tools. I thought I’d repost it since so many people seem to be curious about it. Enjoy!
Wednesday, May 7, 2008
This is our wet saw. It’s the Husky THD 950L 7″ Tile/Stone Wet Saw to be exact, and it cost about $300. If we only had one bathroom to tile, we wouldn’t have spent so much money on a wet saw. But, we have two bathrooms to tile and my parents also have two bathrooms to tile, so we split the cost and now have a family wet saw that will be passed down for generations to come.
Overall, we really like this saw and I would recommend buying one if you have quite a bit of tiling in your future. It’s easy to use, rotates to a 45 degree angle to cut mitered corners and holds up well to lots and lots of cutting.
Here’s what we don’t like: it’s loud (wear ear protection), sprays water all over the place (but that’s to be expected) and the rollers on the sliding table (that you set the tiles on to move under the saw) sometimes get a little stuck. However, the manufacturer does supply you with a bottle of oil to remedy the sticking. Also, this thing is a pain in the butt to clean. 
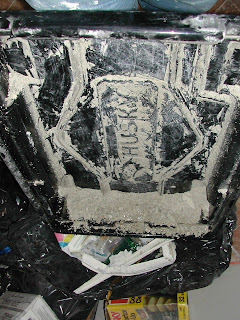
I found it especially annoying that the manufacturer had to put its logo on the water pan, which becomes encased in goopy tile muck that I had to carve out from around the letters H-U-S-K-Y and of course, the little Husky dog head. That poor dog will forever have an eye that’s filled with dried-out tile goo.
Here’s another tool that’s indispensable when tiling:
A nippers. We used our nippers to cut all our circular or curved cuts. You can buy drill attachments to cut circular holes in your tiles, and if you read on, you’ll find out why we had to rely on nippers instead.*** To make a curved cut, we scored the tile with the wet saw and then chopped through the scored part with the nippers following the shape of the curve we needed.
***Since first writing this post, we did find a drill bit that cuts through porcelain/ceramic tile really well, making it easy to cut holes and circles in the middle of a tile. Just ask for it at your local hardware/home improvement store and be prepared to pay about $50-70 for it.
Here are a few miscellaneous tile accouterments that were not useful to us:
We bought this because we over applied the mortar for the floor tiles, causing it to ooze out between the tiles. This is bad, because it fills in the space that the grout is supposed to go in. We hoped this little guy would remove the excess mortar, but its mortar-removing-tip didn’t fit between our tiles.

We purchased this to cut holes in our tile for the pipes and shower faucet. Our tiles are made of porcelain. The package says this thing cuts through porcelain. Nope. It doesn’t. Not even a little bit.
Here’s an item that is necessary, but very frustrating:
These are plastic spacers. They’re used to keep even amounts of space between all your tiles.
Like this:
These things did their job and kept 1/8″ space between all of our tiles. At least when they stayed in place that’s what they did. However, our spacers kept falling out from between our tiles. We wondered if the lighter and smaller rubber version of spacers would stay in place better (less top heavy).
So, there you have it. The good and the bad of tiling tools.
While I’m on the subject of tiling, I just want to assure you that tiling is a very doable project. Joey and I were terrified to try it, and it really wasn’t that bad. It can be time consuming and a bit tedious for first timers, but it’s a job worth doing yourself. Just make sure you study up on the subject first and carefully measure out your tile pattern before diving into the project.


According to my husband, it is the scariest tool he has ever used.